
Monumental VBS Decor ideas
This year our church did the Monumental VBS program and it just so happened that we live in a very similar climate, Arizona! We took a little liberty with the design and decided that we wanted to make ours a nighttime desert scene because who doesn’t love the bright desert sky full of stars?! Below I’ll discuss the various was we used to transform our Apache Junction church for Vacation Bible School with a budget of about $500!


Night Time Desert Decor
To create the night sky we used blue craft paper, fairy lights, construction cardboard, paint, and alien tape…soooo much alien tape! This entire vbs would not have been possible with out alien tape! Amazing because it holds stuff up but doesn’t tear up your wall/paint IF removed properly.
*it should be noted these amazon links we provide are affiliate links, we figure if we are sending people to Amazon we may as well get a small comission to help fund future projects.


How to Make a Desert Night Sky
Okay, let’s talk about how we created this amazing desert night sky!
- Create the cacti out of the construction cardboard, we just freehanded them. (Draw them, Cut them out, and Paint them black.)
- Attach your fairy lights to the wall using small selections of alien tape. I hid a few constellations using a projector to place the lights aka stars but you can keep it simple and skip that step.
- Cover the wall with the blue craft paper linked above.
- Cut small holes in the blue paper where the lights are to allow the light to peep through. This is a slow process but SO worth it!
- Attach the cacti you made in step one to the wall using alien tape.
- Bam! Stunning desert night sky is sure to wow everyone!

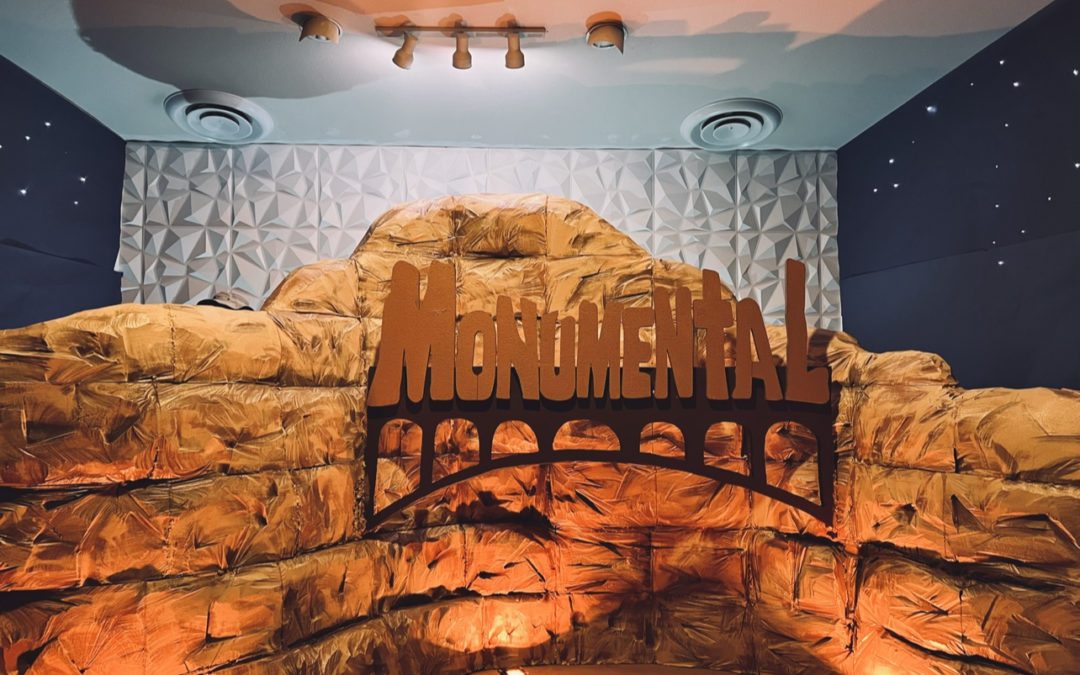
As expected this mountain was a highlight! Everyone was so impressed with this giant mountain that seemed to appear out of nowhere! Well as any crafter knows, it didn’t come out of nowhere! It was *hours* of careful construction.
So, first let’s talk about supplies for this literal mountain!
We got lots of square blocks (free) from tractor supply! They use them to ship their trailers and if you go at the right time you can get them given to you.
We used paint, 2 different shades – a darker one for shadows and contouring and a lighter one for the base.
We used foam cutters, exact one linked, to shape the blocks. This was a slow process, get multiple cutters and recruit help!
How to Build a Foam Mountain
- Assemble the blocks to be the shape you’d like
- Make sure to cut them at angles to allow them to fit together
- We glued them together with Gaps and Cracks. * Pro Tip: get more than you think you need, running to the store mid-project is the literal worst!
- Use the foam cutter to shape the mountain. Cut off sharp edges, cut random holes, and just shape it like rocks. This is a SLOW process, be sure and get help if possible! Also, ventilation! The foam smell is AWFUL! Have a mask, open doors, and don’t just breathe in those fumes. They are very likely toxic.
- Paint the lighter base color over the entire mountain.
- Highlight shadow areas with the darker paint color you choose
- Bam! EPIC Mountain! YAY!

So if you’re looking at the picture I’m sure your next question is, well how do I make that bridge and those amazing letters? Well for the letters, cheat. HAHA! We ordered those from a local foam guy and they were around $150. But so worth it! We wanted the exact font of the program so we elected to leave that to the professionals. You can of course cut them yourself out of foam but it was a bigger pain than we wanted to deal with this time around.
How to Build a Foam Bridge
To build this bridge you will need:
- large construction foam
- a projector
- brown paint
- black paint
- gaps and cracks
- foam cutter with probe attachment, one linked above has this included
- Sharpe
- Use the projector to project your bridge on the foam
- Trace the lines with a Sharpe
- Cut out foam with a foam cutter
- Paint bridge brown
- Go over the inside of the arches with black paint to create depth
- Attach to mountain with gaps and cracks
- You can use screws to help hold in place if needed
- Bam! Amazing bridge! TBH this bridge was inspired by the Cars ride at Disneyland

Other Monumental VBS Ideas
We wanted the inside to be the highlight but was also wanted a welcoming foyer for our VBS kids. So to do this we created a cacti forest! We made simple prickly pair cacti out of construction foam and paper-mached larger ones.
To do the prickly pear ones you can just freehand them with a box cutter or foam cutter. If using a box cutter, get ear plugs if you’re like me and can’t stand cutting foam! Also if that is you, this whole VBS will be a nightmare for you! I still cringe thinking about all that foam noise! Bleh! Paint them fun colors! Why not have purple and pink prickly pear cacti?!
For the tall cacti,
- we used the construction cardboard – rolled it up,
- put a balloon at the top, middle, and end to make it stand out
- paper mache the outside with newspaper
- then cut small slits in streamers to make “fluffy”
- wrap around the cacti
- for arms – cut out of construction foam and paint
We used Concordia’s themed animals to name the sections. The kids loved getting to have their own group mascot! Highly recommend grabbing those from Concordia Supply.
We LOVED the way this VBS turned out! The kids love how dramatic the decor is. We hope you are able to use some of ideas to make your VBS MONUMENTAL!
If you’re looking for a fun Christmas idea, be sure and check out our ski lodge Christmas we did!